
Affiliate Disclosure: This article contains affiliate links. If you make a purchase through these links, we may earn a commission at no additional cost to you.
 Mena
MenaHey, I’m Mena (@menachite), a hybrid engineer who works across both mechanical and electrical fields. Figuring out what to actually buy for a LAN port DIY project is oddly confusing, so here’s a rundown of the 4 tools you need, plus what to know about local electrical regulations before you start.
In short: get a LAN cable tester to check your wiring, a crimping tool to make cable-end plugs, a punch-down tool to wire up a wall jack, and a keystone jack to mount in the wall. Those four cover a full LAN port installation. If you only want to make one custom cable, the tester and crimping tool are all you need.
We’ve also published a write-up of our own LAN port installation attempt, including everything that went wrong (linked below). That article is the “here’s what actually happened” story; this one is the “here’s what to buy before you start” shopping guide. We’d recommend reading this one first to get the full picture, then reading the field-report for a feel of what the work is actually like.
Before you buy anything, there’s one thing you absolutely need to understand: whether you need an electrician’s license, and the risks of working inside your walls. We cover this with a general safety framework later in this article — please read it before you start shopping for tools.
At a Glance: 4 Tools You Need for a LAN Port DIY Project
If you’re only adding one LAN run, a crimping tool (to make plugs on both cable ends) plus a tester (to check your work) is enough. If you’re going further and installing a proper wall-mounted LAN outlet, you’ll also need a punch-down tool and a keystone jack.
| Tool | What it’s for | Best for |
|---|---|---|
| Remote LAN cable tester (RJ45/RJ11, detachable remote unit) | Checks continuity and wiring faults | Anyone worried about miswiring or breaks |
| Ratcheting pass-thru crimping tool | Through-style, ratchet mechanism, PoE-rated | Making or extending your own cables |
| Punch-down tool with interchangeable 110/Krone/BIX blades | Covers all 3 major termination standards | Wiring a DIY wall jack |
| Cat6A keystone jack (110-type punch-down) | 10GBASE-T rated, wall-mount type | Anyone installing a new wall LAN port |
4 Essential Tools for LAN Port Installation
Remote LAN Cable Tester (RJ45/RJ11)
MenaYou can’t judge a crimped plug or a punched-down jack “by eye.” Always run this tester on anything you make before you trust it.
This is a two-piece remote-unit style tester: a main unit and a detachable remote unit that checks continuity and wiring faults on RJ45 (Ethernet) cable, and also supports RJ11 phone-style modular cable.
Because the remote unit detaches, you can test a cable that’s already run through a wall or ceiling by plugging each end in separately — one of the most useful features for in-wall installs.
Wiring mistakes in a crimped plug or a punched-down jack are easy to miss just by looking, and they tend to show up later as flaky, unstable connections. Get in the habit of testing continuity every time you finish a termination.
Ratcheting Pass-Thru Crimping Tool
MenaPass-thru style connectors let you feed the wires all the way through and trim them flush during the crimp itself, so the wire order is much less likely to shift on your first attempt.
This is a ratcheting crimping tool built for pass-thru style RJ45 connectors, and it also handles RJ11/RJ12 modular plugs. Pass-thru connectors let you push the conductors all the way through the plug before crimping, trimming the excess automatically — a big advantage for beginners over standard (non-pass-thru) connectors.
Because it’s a full-cycle ratchet, you get consistent crimp pressure every time without needing a strong grip. It works with both solid and stranded conductors, and is rated for standard UTP/STP cable as well as PoE (Power over Ethernet) cable.
Prices for this category run from budget models to higher-end ones with built-in cable strippers and wire cutters. If you plan on making, extending, or adding LAN cables more than once, it’s worth starting with a full-featured ratcheting model — it’ll save you from a lot of frustrating do-overs.
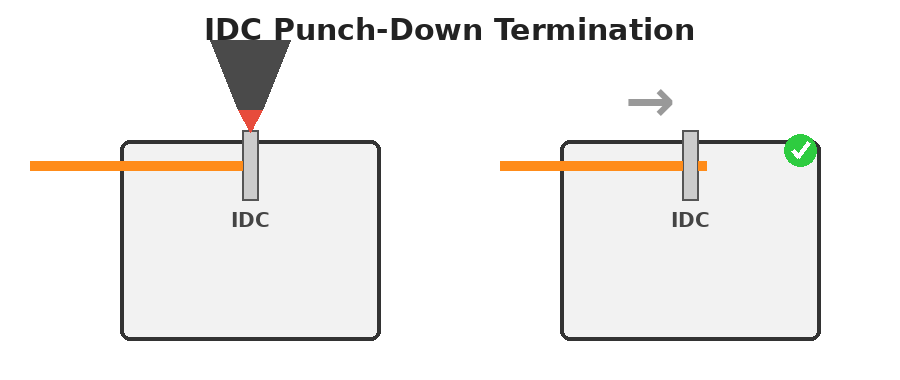
Punch-Down Tool (110/Krone/BIX Interchangeable Blades)
MenaWall jacks use different termination standards (110, Krone, BIX) depending on the maker and model, so a tool with swappable blades for all three saves you from buying the wrong one twice.
A punch-down tool is the dedicated tool for “punching down” — pressing a bare conductor into the insulation-displacement terminals on the back of a keystone jack or patch panel. This model has interchangeable blades that cover all three major termination standards: 110, Krone, and BIX.
Because the termination standard varies by manufacturer and product line, check which standard your keystone jack uses before you buy blades. Having all three covered from the start means you won’t get stuck mid-project with the wrong tool.
Where the crimping tool makes the “plug” on the cable end, the punch-down tool makes the “jack” on the wall side. A full LAN port installation typically needs both.
Cat6A Keystone Jack (110-Type Punch-Down)
MenaCat6A supports 10GBASE-T, so even if your current connection isn’t that fast, choosing this now means you won’t have to rip the wall open again later to upgrade.
This is a Cat6A-rated keystone jack designed to be punched down onto a wall plate, using the 110-type termination standard. It’s built to snap into standard modular wall-plate systems.
Keystone jacks are a standard size across brands, so they’ll generally fit into any keystone-compatible wall plate alongside your existing power outlet covers without looking out of place.
Cat6A supports 10 Gigabit Ethernet (10GBASE-T). Even if your current network speed doesn’t need it, picking Cat6A now means you won’t have to redo the wiring later when you upgrade. Termination is done with the punch-down tool described above.
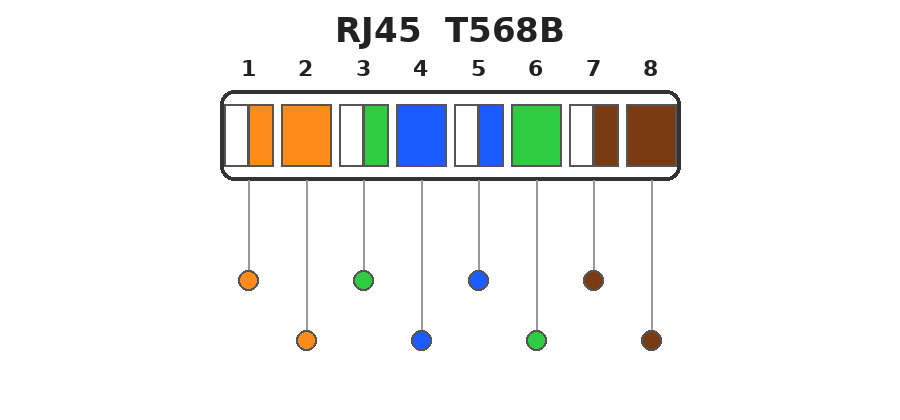
Handy Accessories for a LAN Port DIY Project
Beyond the 4 tools above, these two items will make the work go a lot smoother.
Stud Finder
Before cutting into a wall to install a new LAN outlet, knowing where the studs and any existing power wiring run makes the job much safer. This ties directly into the in-wall wiring safety notes later in this article — get one if your install involves cutting into a wall.
Bulk Solid-Core LAN Cable
Rather than buying a pre-made patch cable, a spool of solid-core cable lets you cut exactly the length you need — handy for runs through walls or ceilings. It’s meant to be paired with a crimping tool to add your own plugs, so make sure the cable category (Cat6/Cat6A/etc.) matches the connectors you’re using.
Do You Need a License to Wire a LAN Port?
Rules on this vary by country and region, so treat the following as general guidance rather than legal advice for your specific location — always check your local electrical code if you’re unsure.
As a general rule, low-voltage structured cabling — Ethernet/LAN cable and jacks — is treated very differently from line-voltage (“mains”) electrical wiring. LAN cable only carries a low-voltage data signal; it isn’t connected to your home’s 120V/240V power system. In most jurisdictions, this kind of low-voltage data cabling is not something that legally requires a licensed electrician, and DIYers making their own cables or punching down a keystone jack is common and generally accepted.
But Anything Touching Mains-Voltage Wiring Needs a Licensed Electrician
The one situation to watch for: wall plates that combine a LAN jack with a power outlet in a single unit. On these, the LAN side is still fine to wire yourself, but the power-outlet side is mains-voltage electrical work, and in virtually every jurisdiction that legally requires a licensed electrician. Don’t assume “it’s just a LAN job” and start poking around the power side of a combo plate — that’s both against the law in most places and a real shock/fire hazard. If you open a wall plate and see power cables, stop there and call a licensed electrician for that part.
Separately, connecting to your telecom provider’s network equipment (the carrier side, not your in-home wiring) may require its own certified technician in some countries — but that generally doesn’t apply to a self-contained, in-home LAN port project like this one.
Safety Notes for In-Wall and Attic Wiring
Running LAN cable through a wall or attic doesn’t require a license, but cutting into a wall or reaching into a ceiling cavity means you need to be careful not to damage existing mains-voltage wiring. Power cables for outlets and light fixtures commonly run through the same wall cavities, and nicking one is a real shock and fire risk.
Use a stud finder (many models also detect wiring) to get a rough sense of what’s behind the wall before you cut, and go slowly, checking as you go. If you don’t have existing wiring diagrams and aren’t confident about what’s inside the wall, or if contact with power wiring seems unavoidable, it’s worth calling in a licensed electrician rather than pushing ahead.
General Steps for a LAN Port DIY Project
1. Making Your Own Cable to Add One LAN Run
Cut a store-bought LAN cable to the length you need, then crimp an RJ45 plug onto each end with your crimping tool. Once both ends are terminated, always check continuity and wiring with your LAN cable tester before putting it into service. Since this method doesn’t require cutting into any walls, it’s the easiest way to get started.
2. Installing a New Wall-Mounted LAN Outlet
Run cable through the attic or wall cavity, then mount a keystone jack into a wall plate. Terminate the conductors onto the back of the jack with your punch-down tool, then finish by checking continuity with the tester. Because this involves cutting into a wall, make sure you’ve reviewed the in-wall wiring safety notes above before you start.
More Electrical Wiring & Cabling Guides
If this project gets you interested in more serious conduit-based wiring work, or in labeling your cable runs to keep everything organized, check out these related guides.
- Not All the Same: 5 Klein Tools Fish Tapes Compared by Length and Material
- 10 Best Professional Cable Labeling Printers for Electrical & Facilities Work (2026) (original article in Japanese)
FAQ
Q. Do I need an electrician’s license to DIY a LAN port?
A. As a general rule, no — low-voltage LAN cabling is typically treated separately from licensed electrical work. The exception is any wall plate that combines a LAN jack with a power outlet: the power side of that plate is mains-voltage work and needs a licensed electrician. See the “Do You Need a License” section above, and check your local code if you’re unsure.
Q. Do I need both a crimping tool and a punch-down tool?
A. They do different jobs. A crimping tool makes the RJ45 plug on the cable end; a punch-down tool terminates the conductors onto a wall-mounted keystone jack. If you’re only making one cable, the crimping tool alone is enough. If you’re installing a new wall LAN outlet, you’ll need both.
Q. How do I know which termination standard (110/Krone/BIX) my keystone jack uses?
A. Check the product listing or included instructions for the keystone jack you bought. If you’re not sure, a punch-down tool with interchangeable blades for all three standards means you won’t need to buy a second tool later.
MenaWith the right knowledge and the right tools, a LAN port DIY project can save you a lot compared to hiring it out. Just leave anything touching mains-voltage wiring to a licensed professional.
Summary
For a LAN port / keystone jack DIY project, you’ll want a LAN cable tester, a ratcheting pass-thru crimping tool, a 110/Krone/BIX punch-down tool, and a Cat6A keystone jack. Most of the LAN wiring itself doesn’t require an electrician’s license, but be careful around any mains-voltage wiring on combo power/LAN wall plates or existing in-wall power cable — and don’t hesitate to call a licensed electrician if you’re unsure.
We’ve also published a field report of our own (messier) attempt at a home LAN port install — check it out below if you want a feel for what the actual work looks like.